

Configure staged upload
Recordings can be moved from agent PCs to the cloud in three different ways. All three methods require QM workflow events and agent PCs with Smart Desktop.
- Upload recordings to the cloud immediately after a contact completes.
- Store recordings on an agent’s PC and then upload them to the cloud once a day.
- Upload recordings to a Data Server in your contact center immediately after a contact completes (stage one) and then move them to the cloud once a day (stage two).
This topic covers only the third option, called “staged upload.” Staged upload lets you keep your recordings in a secure location without overloading your internet bandwidth.
Contacts handled with Staged Upload appear on the Interactions page after they are finished recording, but they have a “Not yet uploaded” File Upload State until the staged upload process is complete.
The following image shows the data flow for a basic staged upload configuration.

Prerequisites
- Agents are enabled for audio and/or screen recording.
- Agent PCs have Smart Desktop installed.
- You have all of these permissions:
- Administer Tenant
- Administer Org. Structure (needed to use teams to associate agents with the Staged Upload Data Server)
- Administer Workflow
Page location
Varies. See the procedures below for details.
Procedures
There are four steps to setting up Staged Upload:
- Step 1: (Optional) identify agents who will use staged upload
- Step 2: Configure the staged upload component
- Step 3: Associate agents with the Staged Upload Data Server
- Step 4: Configure a daily event workflow rule for staged upload
Step 1: (Optional) identify agents who will use staged upload
Step 1 is a planning step, not a configuration step. First identify the agents who will use staged upload so that you can create the necessary configurations with those agents in mind. All agents in your contact center can use staged upload, or only some of them.
Step 2: Configure the staged upload component
Configure the Staged Upload Data Server
- Enable the SMB 1.0 File Sharing Support feature on the server that you will use for staged upload.
Create the staged upload storage location
- Create a folder in the location where you want to store recordings before they are uploaded to the cloud. This location can be on the Data Server, or it can be in another location (for example, NAS).
- Configure the folder’s sharing properties so that agent PCs can access it. If the folder is not on the Data Server, you must also configure the sharing properties so that the Data Server can access it.
- Copy the UNC path to the folder. You will use this later.
Enable the staged upload component
- Navigate to Application Management > Global > System Configuration > Data Server Configuration.
- Select the Data Server to use for staged upload from the Select Data Server Configuration drop-down list.
- Under Regional Data Server Staged Upload Settings, select Enable Staged Upload. Additional fields appear.
-
Configure the fields as follows.
Field Configuration Location
The UNC path to the staged upload storage location that you copied earlier. Agent PCs must be able to access this location.
EXAMPLE \\ServerName\FolderName
Username
The user name of the person who administers the Staged Upload Data Server.
EXAMPLE Domain\user.name
Password
The password of the person who administers the Staged Upload Data Server.
- Click Save.
Step 3: Associate agents with the Staged Upload Data Server
This step enables agent PCs to send recordings to the staged upload storage location, where the recordings are stored until the QM workflow daily event (configured in Step 4) runs and uploads them to the cloud.
NOTE Recordings for any agent who is not associated with the Staged Upload Data Server will upload according to the first QM workflow event with matching conditions. This can result in immediate upload to the cloud or delayed upload to the cloud where recordings remain on the agent’s PC longer than desired.
You can associate agents with the Staged Upload Data Server in one of three ways: IP addresses, teams, or both IP addresses and teams.
Use IP addresses to associate agents with the Staged Upload Data Server
- Navigate to Application Management > Global > System Configuration > Data Server Configuration.
- Select the Staged Upload Data Server from the Select Data Server Configuration drop-down list.
-
In the Staged Upload IP Address Filter Configuration section, enter at least one range of IP addresses in CIDR notation. Any agent whose PC has an IP address matching this range is associated with the Staged Upload Data Server.
IMPORTANT This IP address range must include the IP addresses of all PCs of all agents who will use staged upload. The address must identify the public or external network that the agents’ desktops communicate from. If your organization uses a NAT firewall, do not use the address for its local or internal subnetwork.
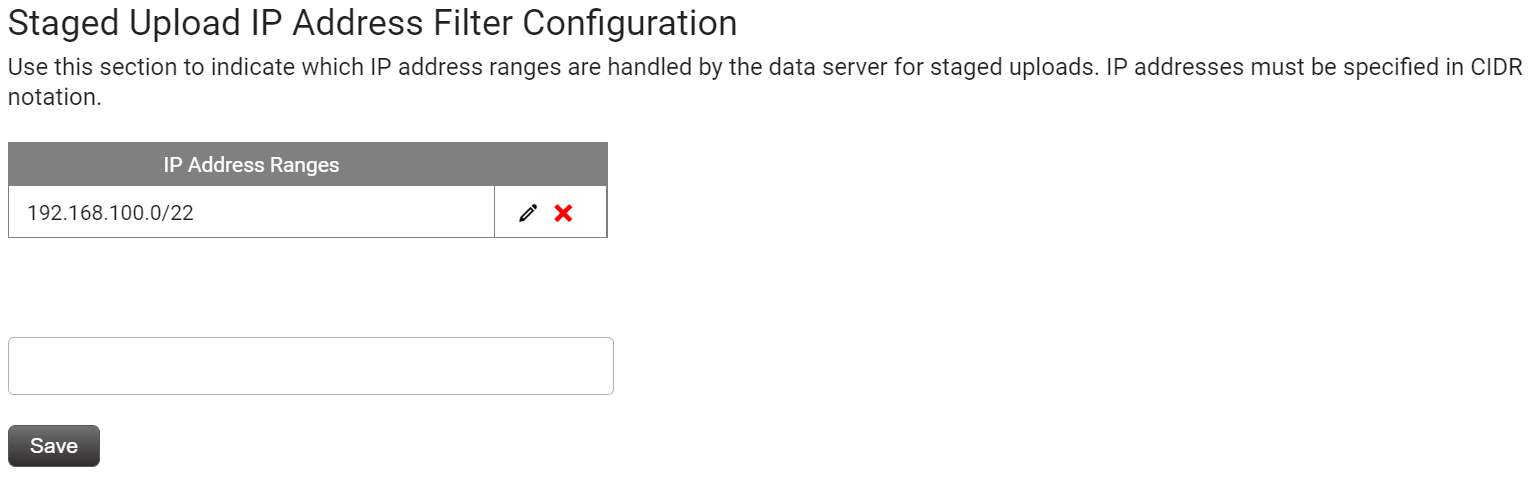
- Click Save.
Use teams to associate agents with the Staged Upload Data Server
You can assign the Staged Upload Data Server to one or more teams and then assign all the agents who will use staged upload to one of these teams.
- Navigate to Application Management > Global > User Configuration > Teams.
- Select the team to associate with the Staged Upload Data Server from the Select a Team drop-down list.
-
Under Users, move the agents to assign to this team from Available to Assigned.
NOTE You can also assign individual users to teams on the Users page.
- Under Staged Upload Location, select the Staged Upload Data Server.
- Click Save.
Use both IP addresses and teams to associate agents with the Staged Upload Data Server
- Associate the agents’ IP addresses with the Staged Upload Data Server as described in one of the earlier procedures.
- Associate the agents with a Staged Upload Data Server team as described in one of the earlier procedures.
Various configurations with agent teams and IP addresses produce different results. The table below identifies whether an agent does or does not use staged upload based on these configurations.
| Agent team associated with Data Server? | PC in IP filter | PC not in IP filter | No IP filter used |
|---|---|---|---|
|
Yes |
Uses staged upload |
Does not use staged upload |
Uses staged upload |
|
No |
Uses staged upload |
Does not use staged upload |
Does not use staged upload |
Step 4: Configure a daily event workflow rule for staged upload
Rules are composed of actions and conditions. An action is what Calabrio ONE does with a recording. Conditions are criteria that a recording must meet for the action to happen. This rule sends recordings from agent PCs to the staged upload storage location (configured in Step 2) instead of storing them on agent PCs or uploading them immediately to the cloud. For more information about configuring rules for QM workflow events, see Automate QM workflows.
Create a rule for staged upload
- Navigate to Application Management > QM > QM Contact Flows > Workflow Administration.
- Select Daily Event.
- Under Time, select the time to upload recordings from the staged upload storage location to the cloud.
- Enter a unique name for the rule in the Name field.
- Click Save Rule.
- Select the rule from the Rules list.
-
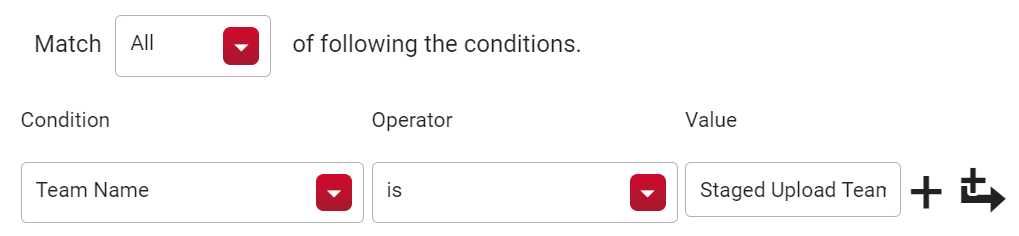
In the Conditions section, specify criteria that apply to all recordings captured by the PCs of all agents who will use staged upload.
EXAMPLEAll the agents who will use staged upload are assigned to the Staged Upload Team. The condition looks like this:
-
In the Actions section, create an action that prevents voice and screen recordings from being immediately uploaded.
IMPORTANT At a minimum, you must clear the Immediate Upload check boxes for voice and screen recordings. A workflow rule that is configured with immediate upload always uploads recordings to the cloud immediately, even if a Staged Upload Data Server is configured and agents are associated with it.
EXAMPLEAll voice and screen recordings that meet the criteria you specified in the Conditions section will be handled by staged upload. The actions look like this:

- (Optional) Refine the conditions and actions further if needed. Steps 7 and 8 provide the minimum configuration necessary.
- If you use rules for other purposes besides staged upload, order the rules to prevent any conflicts. Calabrio ONE processes each recording according to the first rule in the list whose conditions match it. See How workflow administration works for more information about potential conflicts between workflow rules.
- Click Save.
Related topics
- Manage roles and permissions for QM, Analytics, Insights, and Performance Management—Learn about the permissions needed to enable agents for recording.
- Configure the Data Server for QM and Analytics—More information about the settings available for Data Servers.
- Manage teams for QM, Analytics, Insights, and Performance Management—More information about configuring teams.
- QM Quick Reference Guide to Workflows—An introduction to workflows, with some basic examples.
- Automate QM workflows—Detailed information about automating how Calabrio ONE handles recordings.
- How workflow administration works—Additional information about how workflows work.