

WFM: 5 steps of forecasting (ongoing)
 This feature is also available to Calabrio GovSuite users.
A forecast estimates the number of people your contact center will need to achieve your service-level goals.
Video Overview: 5 Steps of Forecasting (length 13:02)
Forecasting process overview:
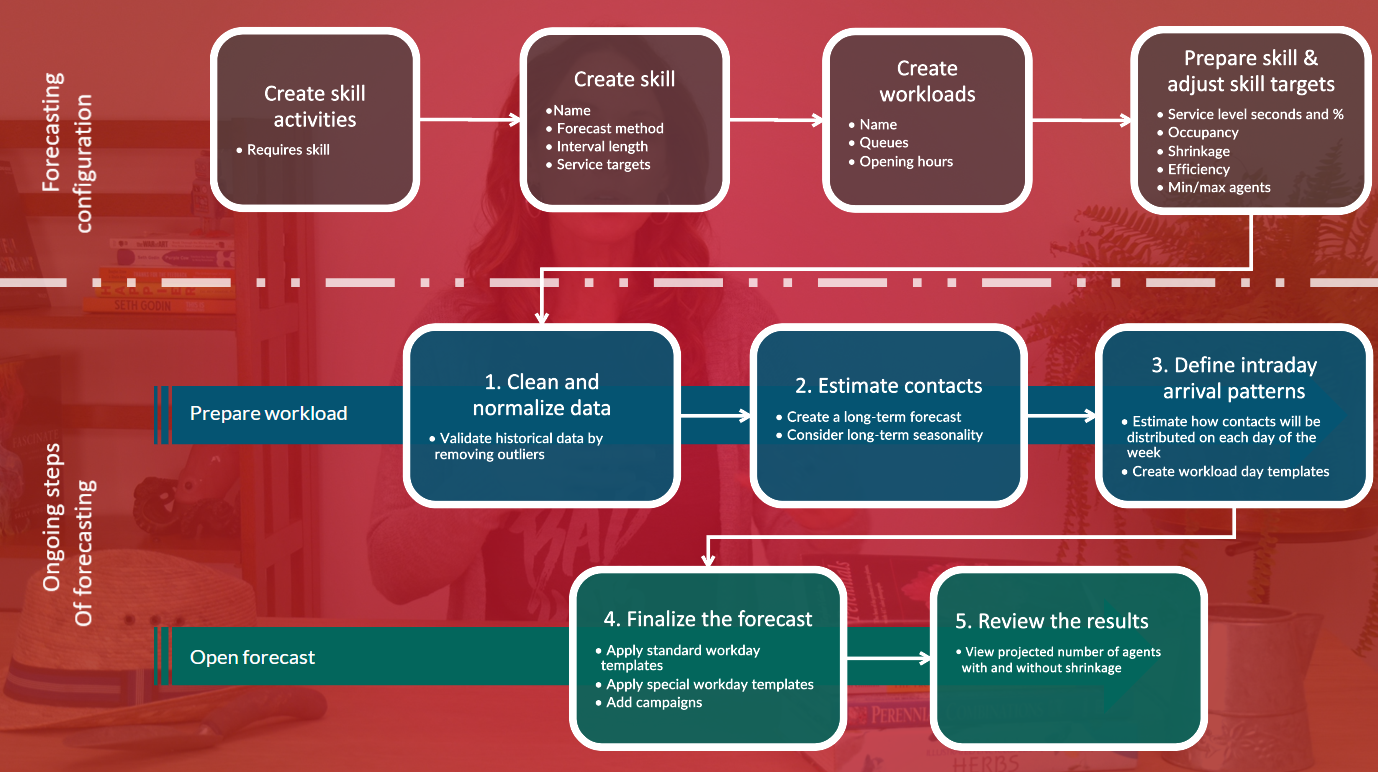
Prerequisites
- The skills and workloads are configured. This is normally configured once, and then you rarely need to make changes.
- Review the skill templates and ensure that the default targets are correct. Shrinkage is the most common value to update because it might differ for different times of the year.
Step 1: Clean and normalize historical data
Page location: Client > Forecasts > Prepare workload > Validation tab
In this step, you review recent contact data and remove outliers that should not be used as the basis for a long-term forecast. For atypical data that is accurate but unique (for example, a holiday), create special events to handle these dates separately.
You should do this for each workload once a month.
- In the Forecasts module, right-click on the workload and select Prepare workload. The Prepare workload window opens.
- Select the validation and comparison periods. If you’re validating a month’s worth of data, these periods can be the same.
- Click Apply.
- In the Deviation section, set the acceptable amount of variation from the average. Days with a variation that is greater than the deviation appear in red in the table.
- If you see any atypical data in the Validated row:
- To mark the day’s volume as accurate but unique (for example, a holiday), right-click the cell and select Add special event.
- To change the volume to the average, right-click the cell and select Use average.
- To change the volume to a specific number, click the cell and enter the new value.
- Click Next to save and go to the Long-term forecast tab or click Finish to save and close the window.
See Validate historical data for more detailed information.
Step 2: Estimate future contacts
Page location: Client > Forecasts > Prepare workload > Long-term forecast tab
In this step, you use relevant data from the past to create a long-term forecast. The long-term forecast is a prediction of the future resource need for each day. It is used to give a rough estimate for the resource need over a longer period, for example the next 6–12 months. The long-term forecast is used as the foundation to create a more detailed forecast later. It can also be used to create a long-term staffing budget.
- On the Data summary sub-tab, apply the period(s) of time to use as historical data. Add and remove time periods as needed until the data time range is an accurate predictor for the future. Generally, you should use at least two years’ worth of data to create a long-term forecast, but if contact volume has recently changed significantly, you might want to use more recent data only.
- Click Next.
- On the Month of year, Week of month, and Day of week sub-tabs, verify that the data represents a typical call-volume pattern. The fluctuations are important here, not the actual volume. You can use different historical time periods on these tabs if needed. Make changes as needed and click Next.
- (Optional) On the Trend sub-tab, adjust the trend as needed and click Next. (If you’re not using a trend, clear the Use trend check box.)
- On the Total tab, apply the scenario and time period that will receive the forecast. A preview of predicted daily volume, talk time, and after-call work appears.
- Click Next to save and then go to the Workload day templates tab or click Finish to save and close the window.
See Create a long-term forecast for more detailed information.
Step 3: Define intraday arrival patterns
Page location: Client > Forecasts > Prepare workload > Workload day templates tab
In this step, you use relevant data from the past to estimate how contacts will be distributed on each day of the week. You should do this regularly, whenever customer behavior changes. For example, if customer behavior changes seasonally, update the arrival patterns every three months.
- Apply the period(s) of time to use as historical data. Eight weeks is usually enough time. You could select the most recent eight weeks or an eight-week time period from this time last year.
- For each day of the week, click Filter. The Filter days for template window opens, showing call volume for that day of the week within the time period(s) you selected.
- Verify that the data represents a typical pattern. To remove a day with abnormal data from the template, clear its Include check box. Click OK to close the Filter days for template window.
- (Optional) For each day of the week, smooth the calls, talk time, and after-call work as needed. Smoothed data makes it easier to create a schedule, but too much smoothing erases important variations in volume.
- Click Finish. The workload day templates are saved and the Prepare workload window closes.
See Define intraday arrival patterns for more detailed information.
Step 4: Finalize the forecast
Page location: Client > Forecasts > Open forecast
Step 3 created a standard workload day template. In Step 4, you apply the template to the workload. If the skill has more than one workload, complete Steps 1–3 for all the workloads before doing Step 4.
- Right-click the skill and select Open forecast.
- Select the time period and scenario for the forecast and click OK.
- In the Views section, select Day for both Workload and Skill.
- For each workload connected to the skill, select the Template row, click the Workload tab, and click Apply standard.
- (Optional) Apply special workload day templates as needed, for example for national holidays. To create a new special workload day template, click New.
- (Optional) Adjust the volume as needed, for example because of ad campaigns. Enter a campaign percentage to adjust the volume.
- (Optional) Click the Skill tab, adjust skill templates as needed and apply the updated skill templates. To create a new skill template, click New.
- Click Save.
See Finalize the staffing forecast in the WFM client for more detailed information.
Step 5: Review the results
Page location: Client > Forecasts > Open forecast
In this step, you can see the final forecast: the projected number of agents needed both with and without shrinkage.
- Click the Home tab.
- In the Show section, click Chart and Skill.
- In the Views section, click Intraday for Skill.