

Create a custom measure
If you want to add a measure to a report that is not in the list of measures, you can create a custom measure by clicking Custom in upper right corner of the Select Measure dialog box.
Custom measures use formulas to alter measures and fields that already exist in the data model. You can create a formula by manually entering measures and operators into the Formula pane. The custom Create Measure dialog box includes lists of the available measures, operators, and references that you can choose from to build a formula.
The Create Measure dialog box for custom measures is made up of two sections: the Formula Editor panel at the top and the Measure Configuration panel at the bottom. For information on the Measure Configuration panel, see Configure a measure’s appearance.
The Formula Editor is context-specific. It allows you to include only the data elements, functions, and other features for your formula that are appropriate for the measure you select.
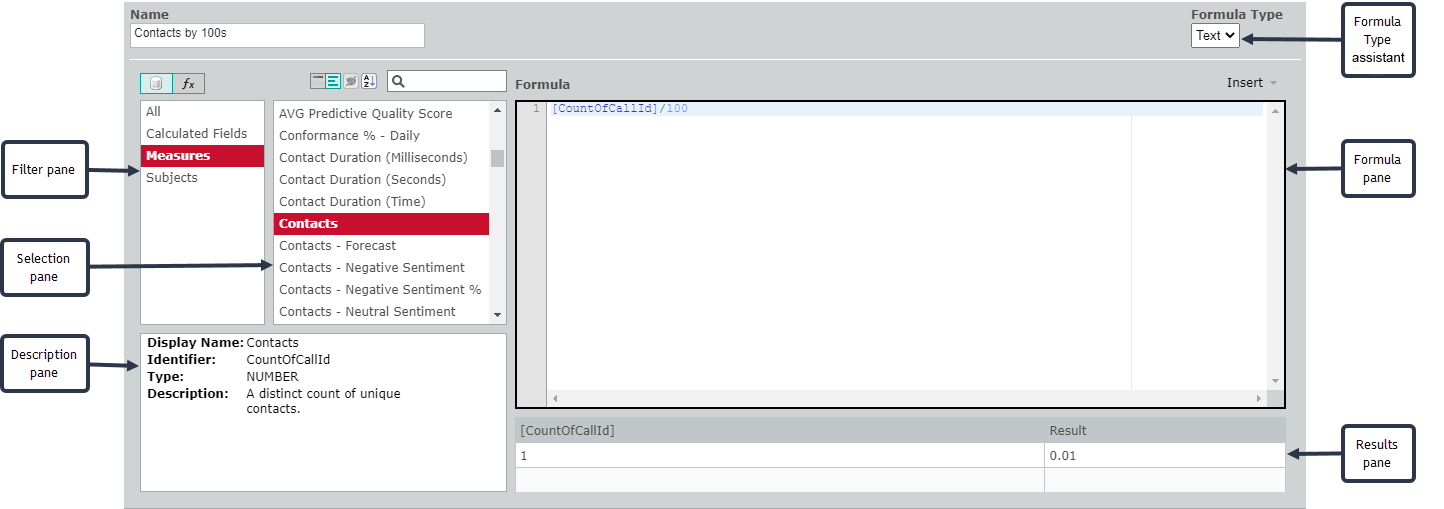
- The Filter pane contains the options you can use to narrow the number of data elements or functions displayed in the Selections pane. For example, if you select Measures in the Filter pane, only measures are listed in the Selections pane. Use the buttons
 above the Filter pane to toggle between data elements and functions. Data elements are the fields in the data library that are available for use in your formula, and functions are defined operational tasks.
 -
The Selection pane displays the elements or functions you can add to your formula. What is displayed depends on your selection in the Filter pane. Use the buttons
 above the Selection pane to toggle between measure or function display names and identifiers. You can sort the data elements or functions in ascending or descending order with the Sort button
  , and search for a specific data element or function with the search field.
 NOTE This button
 is not currently used.
 - The Description pane displays information about the data element or function that you have selected in the Selection pane.
- The Formula pane displays the formula as you create it. This pane includes the data elements and functions you select and whatever other formula elements you enter manually.
- The Results pane attempts to compile your formula as you work and to display the result. It will display an error message if your formula contains errors.
- The Formula Type assistant drop-down list enables you to access assistants that help you create various types of formulas. The default is a text formula, but besides text you can choose from difference, ratio, scale, split, and time shift formula types. See Create a custom measure with a Formula Type assistant for more information.
Example of a custom measure
The Custom Measure function is a tool that can be used to create many different types of formulas with different levels of complexity. There are several ways to create a formula. The following example explains one way to create a custom measure.
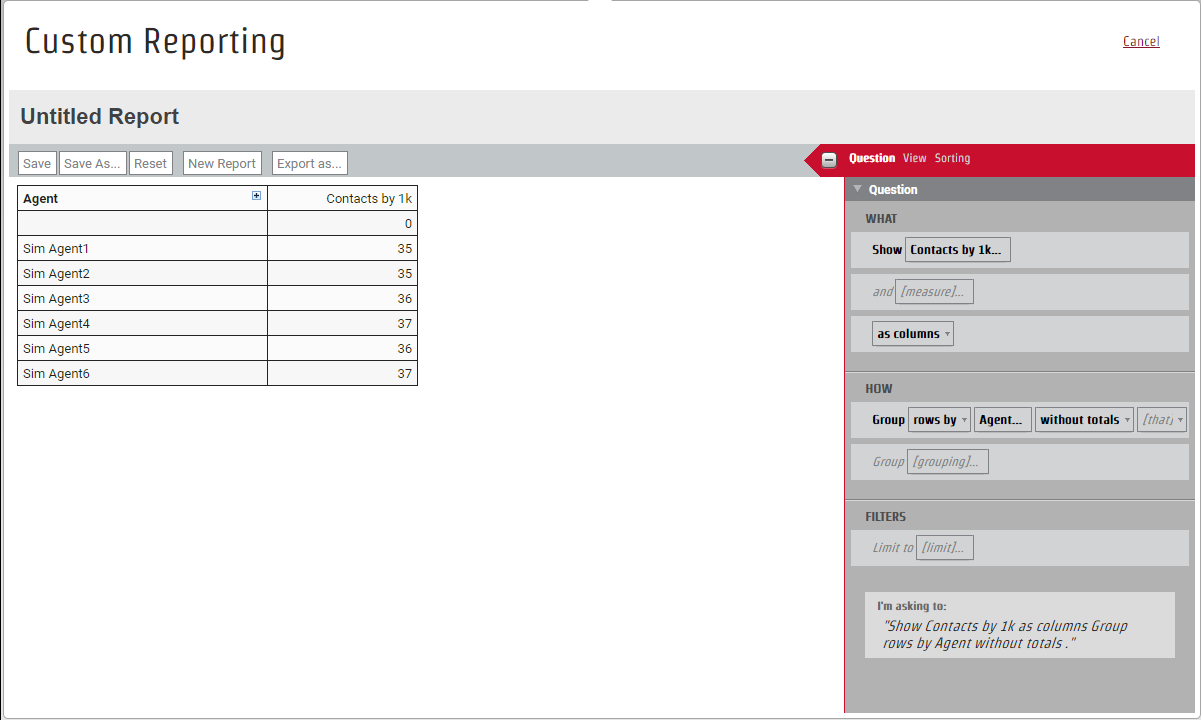
For this example, let us say that you want to see a report that involves the number of contacts your agents handle. Your contact center receives large numbers of contacts, so the report would show each agent handling contacts that can number in the thousands every year. However, you use the report to find agents who are performing above or below the rest of the group, and seeing the exact number of contacts for each makes that difficult to absorb at a glance, as seen in this graphic:

The way to solve this problem is to present the number of contacts as factors of 1,000 in order to see agent productivity at a glance. In this example we will show you how to create a custom measure that divides the number of contacts by 1,000.
Create a custom measure to divide contacts by 1,000
- On the Question tab of the Question panel, click Show [measure]. The Select Measure dialog box opens.
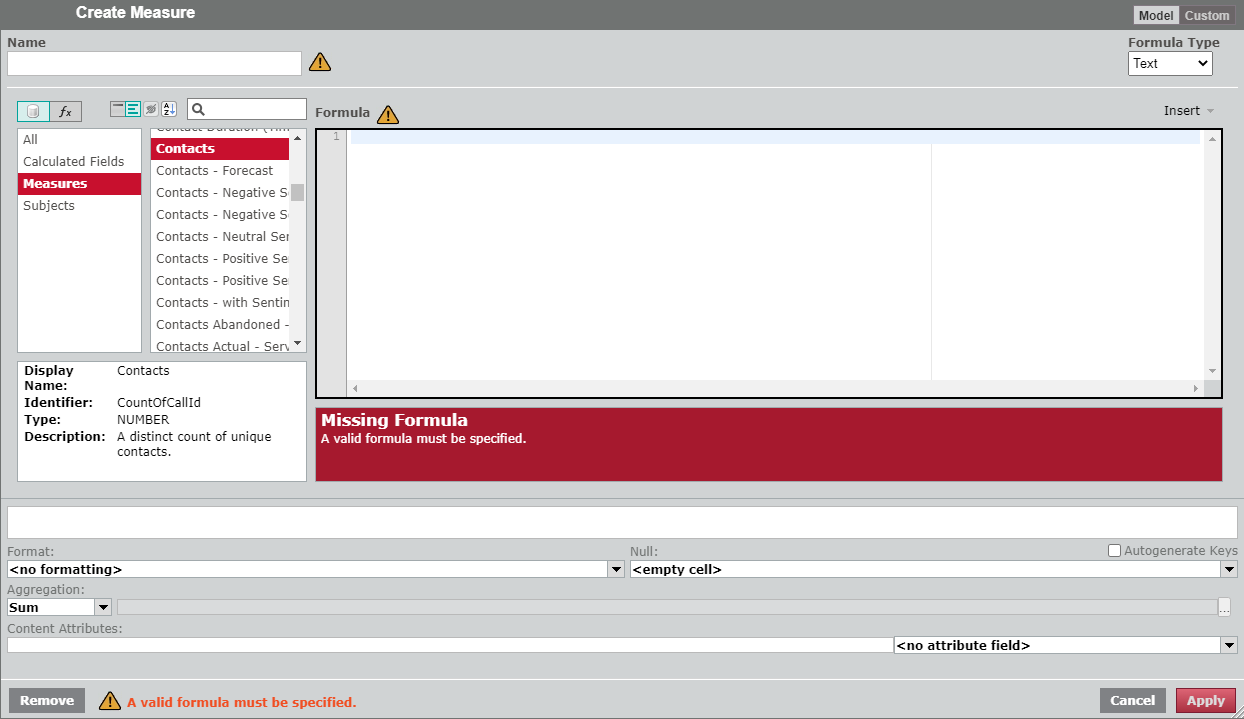
- Click Custom. The Create Measure dialog box opens. The text boxes will be empty, and several warnings will display in the dialog box.
- Enter Contacts by 1K in the Name text box.
-
Locate and select the Contacts measure.
NOTE You might need to clear the search field of an existing search string in order to see all results in the Selection pane.
- To use the Divide function, click the Data Elements/Functions toggle so the Filter and Selection panes display functions.
-
Click Numeric in the Functions Filter pane, and then double-click divide in the Selection pane. The Divide function text is displayed in the Formula pane.

The Divide function text is an outline of the formula. You must replace the placeholder text with the values you want to divide in the order that they would appear in a mathematical equation.
- <num : NUMBER> is the numerator, the number being divided. Replace this with the contact field name.
- <denom : NUMBER> is the denominator, the number you are dividing by. Replace this with 1000.
- <fallback : NUMBER> is an optional value that is displayed if the formula results in dividing by zero instead of returning an error.
- To replace
<num : NUMBER>with the measure for the number of contacts, highlight <num : NUMBER> in the Formula pane. - Click the Data Elements/Functions toggle to display lists of data elements.
- Click Measures in the Data Elements Filter pane, and then double-click Contacts in the Selection pane. The Contacts text appears in the Formula pane in place of <num : NUMBER>.
-
Delete <denom : NUMBER>, and type 1,000 in its place. The Results pane displays a sample of the calculation.
NOTE We have also deleted <fallback : NUMBER> from the formula, because we are not using this optional element.
- To make the results display as a whole number, in the Measure Configuration section, select a format from the Format drop-down list that does not include any decimal places, such as #,###.
-
Click Add. Your new custom measure appears in the Question panel, and the new column in the table displays the number of contacts divided by 1,000.
NOTE As previously mentioned, the Create Measure dialog box includes several options for creating formulas. As an alternative to selecting a Function and editing the placeholder text, you can create a custom measure to divide the number of contacts by 1,000 by selecting the elements individually or manually entering the following formula in the Formula pane.[CountOfCallId]/1000
Related Topics