

Create a custom measure with a Formula Type assistant
Formula Type assistants are guides that help you write the formulas that create custom measures. The default selection is a text formula, where you enter the formula manually without an assistant. If you opt to use an assistant, you can choose from difference, ratio, scale, split, and time shift formula types. Once you choose your formula type, the Formula Type drop-down list will show only your choice plus the Text option.
When you use an assistant, Data Explorer creates a formula based on your selections. This formula is displayed in the Create Measure formula pane. You can view your formula by selecting Text from the Formula Type drop-down list. Return to your assistant by selecting it from the drop-down list.
NOTE Even if you opt to view the display names of the available measures, the formula uses the measure’s identifier, not its display name.
Like any custom measure, you can configure how the measure will appear by configuring the Measure Configuration panel at the bottom of the Create Measure dialog box. See Configure a measure’s appearance for more information.
Provide a name for your custom measure in the Name field. This is what appears in your report to identify the value.
NOTE To understand the formulas these assistants create, refer to the appropriate formula function in the Data Explorer formula language reference.
Difference assistant
The Difference assistant helps you create a formula that subtracts one measure from another measure.

Select the first element of your equation from the Return pane and the second from the less the value of pane (“Return <your first selected measure> less the value of <your second selected measure>”). You can choose the way you want negative numbers to be handled using the options at the right of the panel. The Results pane at the bottom of the panel compiles your formula and shows the result.
In the graphic above, we have subtracted the number of contacts held (Contact.Contact Was Held) from the total number of contacts (Contact). When viewed in the Formula pane, the formula looks like this:
[Call] - [Call].[Contact Was Held]
Ratio assistant
The Ratio assistant helps you create a formula that divides one measure by another measure.

Select the first element of your ratio (the numerator) from the Return the ratio of pane and the second (the denominator) from the by pane (“Return the ratio of <your first selected measure> by <your second selected measure>”). You can choose the way you want a denominator of zero (dividing by zero) to be handled using the options at the right of the panel. By default, dividing by zero returns an error.
In the graphic above, we have divided the number of contacts put on hold (# Contact put on Hold) by the number of contacts taken (# Contacts Taken). When viewed in the Formula pane, the formula looks like this:
[# Paused Calls] / [# Calls Taken]
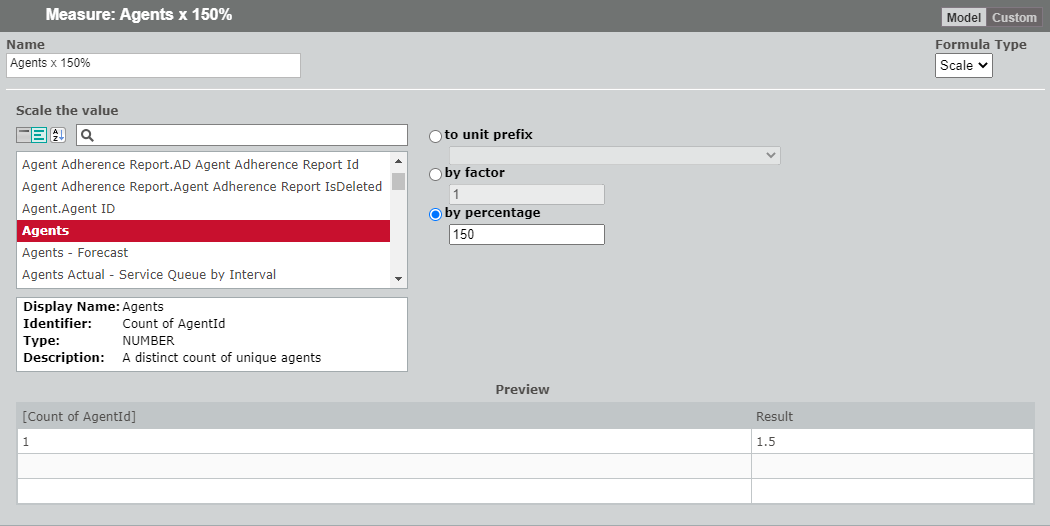
Scale assistant
The Scale assistant enables you to scale up or scale down a measure by unit prefix, factor, or percentage.
-
To unit prefix—This means you can move the decimal place to the left or right of your measure’s value. For example, if the value of the measure is 1, and you select Ten/deca from the unit prefix drop-down list, the value appears as 10 in your report. If you select Hundredth/centi from the unit prefix drop-down list, the value appears as 0.01 in your report. Examples of the resulting formula are:
[Count of AgentId] * 10 (for the Ten/deca option)
[Count of AgentId] * 0.01 (for the Hundredth/centi option) -
by factor—This means you can increase the value of your measure by the specified factor. For example, if the value of the measure is 1, and you enter 15 as the factor, the value appears as 15 in your report. You cannot apply a negative factor to your measure. An example of the resulting formula is:
[Count of AgentId] * 15
-
by percentage—This means you can increase the value of your measure by the specified percentage. For example, if the value of the measure is 1, and you enter 125 as the percentage, the value appears as 1.25 in your report. You cannot apply a negative percentage to your measure.
[Count of AgentId] * 125 / 100.0
Split assistant
The Split assistant helps you select a portion of a measure’s text value to display in a report.
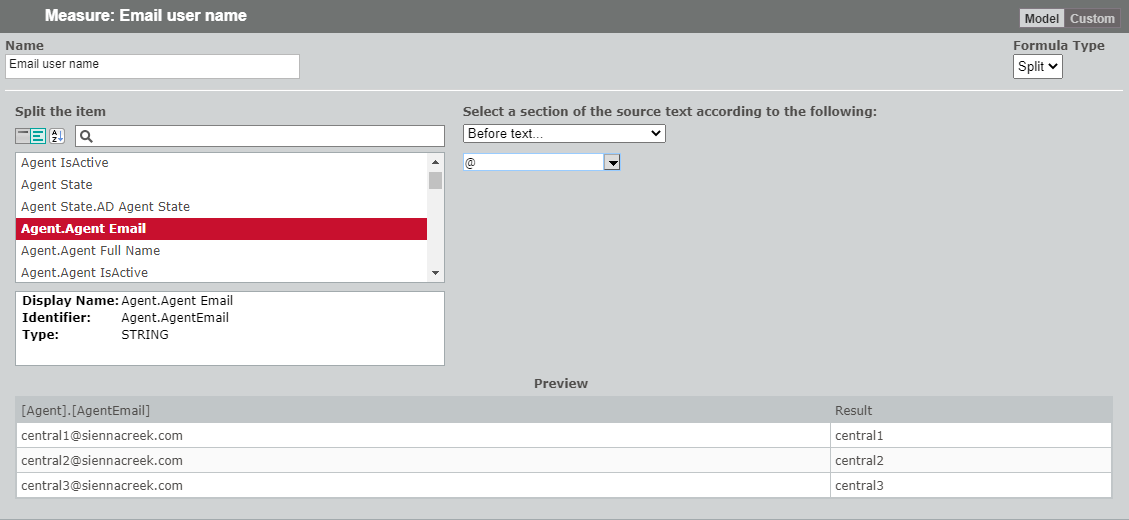
Select how you want to split the text string from the Select a section of the source text according to the following drop-down list. Depending on your selection, one or two fields appear, which you use to define the split.
To illustrate how the split options work, let us assume you have a measure “AgentEmail”. The agent email values are:
| Split wanted | Show only the user name that appears before @ in the email address. |
| Enter | @ |
| Result | agent1
agent2 agent3 |
|
Formula |
split([AgentEmail],“@”,1) |
| Split wanted | Show only the domain name that appears after @ in the email address. |
| Enter | @ |
| Result | siennacreek.com
siennacreek.com siennacreek.com |
|
Formula |
split([AgentEmail],“@”,2) |
| Split wanted | Show only the portion of the email address that ends with and includes the agent ID number at character position 6. |
| Enter | 6 |
| Result | agent1
agent2 agent3 |
|
Formula |
(TBD) |
| Split wanted | Show only the portion of the email address that starts with and includes the agent ID number at character position 6. |
| Enter | 6 |
| Result | [email protected]
[email protected] [email protected] |
|
Formula |
mid([AgentEmail],8,len([AgentEmail])) |
| Split wanted | Show only the portion of the email address that is between and does not include the strings agent and .com. |
| Enter | agent in the first field .com in the second field |
| Result | 1@siennacreek
2@siennacreek 3@siennacreek |
|
Formula |
split(split([AgentEmail],“agent”,2),“.com”,1) |
| Split wanted | Show only the portion of the email address that is between and includes character position 6 and character position 19. |
| Enter | 6 in the first field 19 in the second field |
| Result | 1@siennacreek
2@siennacreek 3@siennacreek |
|
Formula |
mid([AgentEmail],6,13) |
Time Shift assistant
A time shift returns a requested value that is shifted by the specified number of periods. This is useful in calculating period-to-period variances.
EXAMPLE You want to compare 2 separate days of call volumes within the same formula in order to output an aggregate or comparison. Your goal is to understand the difference in the volume of calls on Mondays in Week 1 and Week 3. You find the difference in volume, which can tell you if your compared volumes are higher or lower than the expected norm, or against your forecast.
The Time Shift assistant helps you develop time shift elements of a more complex formula.
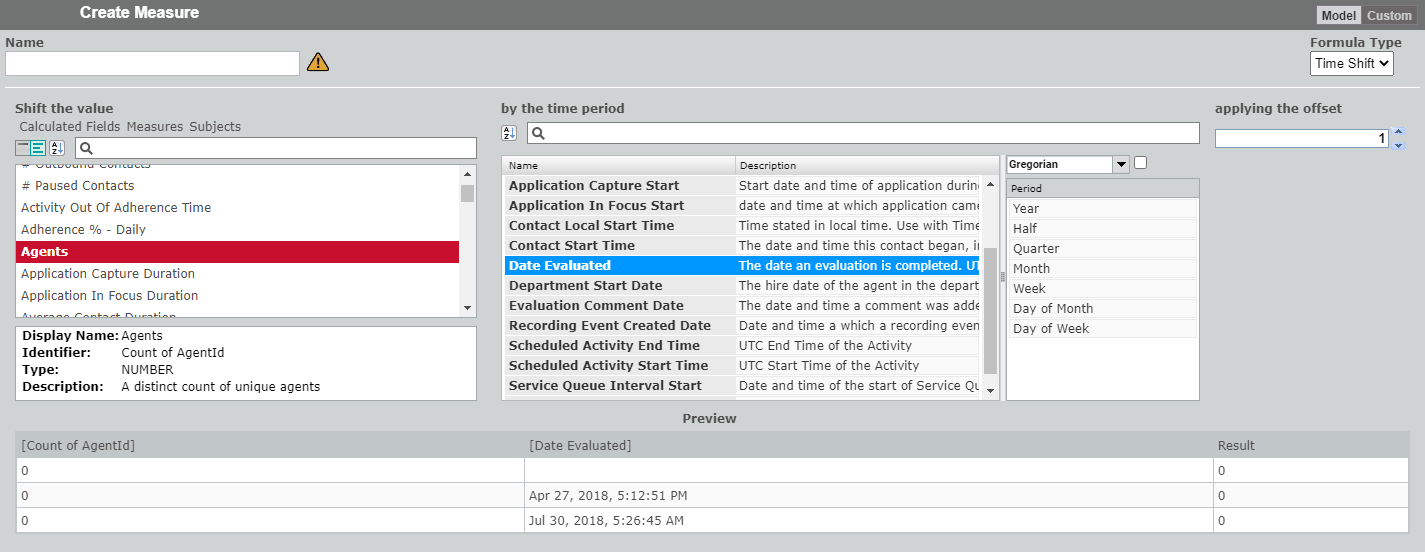
Select the value you want to shift from the Shift the value pane, choose the time period from the by the time period panes, and then enter the offset in the applying the offset field.
In the graphic above, we are shifting the number of agents by the date they were evaluated by 1 year. When viewed in the Formula pane, the formula looks like this:
timeshiftvalue( [Count of AgentId], [Date Evaluated], "FiscalMonthly.Year", 1)