

Adjust agent schedules
For all adjustments, start by hovering over WFM in the top menu and clicking Schedules.
Add an activity
Your company has a new sloth-grooming project that you need to assign to some of your agents. Follow these steps to take the agents off the contact queue for an hour. These steps also work if you need to schedule a meeting.
-
Select the agent. Their schedule is outlined.

NOTE To have multiple agents work on the activity at the same time, select the agents in this step. To have the agents work on the activity at different times, select a single agent and repeat these steps for each one.
-
Select Add activity or Add personal activity from the Add activity drop-down list.
NOTE Activities are attached to a schedule, but personal activities are attached to an agent. If two agents trade shifts, their activities are included in the trade, but their personal activities aren’t part of the trade. To let the activity move to another person if agents trade shifts, select Add activity. To make sure that a specific person does the activity, select Add personal activity.
-
Select the activity type from the next drop-down list.
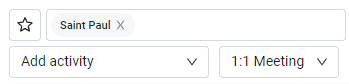
- Select the start and end time for the activity.
- Click Save. The activity appears on the agent’s schedule.
Move an activity
Coverage is looking a little thin today, but you can fix that with a few tweaks. You can move an agent’s break, lunch, or other activity earlier or later in the day. To have Calabrio ONE make multiple changes at once, try Advanced: Optimize the schedule.
NOTE To see staffing levels and agent schedules on the same screen, turn on Show staffing (top center of the page).
- Click the activity you want to move. The activity is outlined.
- Drag the activity to its new time.
Add an absence
An agent’s llama ran away last night, and they need to track it down and repair their fence today instead of coming in to work. Follow these steps to remove them from today’s schedule.
-
Select the agent. Their schedule is outlined.
- Select Add part day absence or Add full day absence from the Add activity drop-down list.
-
Select an absence type from the next drop-down list.

- (Optional) If the agent will be gone for only part of the day, select the start and end time of their absence. If the agent will be out all day, skip this step.
-
Click Save. The absence appears on the agent’s schedule.

Delete or replace an activity in bulk
The Sloth Grooming team is getting overwhelmed with calls. You need to reassign agents from chat to phones for the rest of the afternoon to maintain coverage. Don’t worry, breaks and lunches won’t be affected.
- Select the agents. Their schedules are outlined.
- Select Edit activity from the Add activity drop-down list.
- Select the activity you are removing from the Activity drop-down list. (In our example, this would be Chat.)
-
(Optional) Select the start and end time for the new activity.
EXAMPLE You need to move agents from chat to phone this afternoon but not for the evening shift. Select the end of the afternoon shift as the end time.
- Select Replace activity from the Replace activity drop-down list.
- Select the new activity from the Replace with drop-down list. (In our example, this would be Phone.)
- Click Save. Your changes appear in the agents’ schedules.
Advanced: Optimize the schedule
Scheduling can be messy: your scheduler runs a schedule, but then agents take time off, and other agents get personal activities added to their schedules. These changes can affect coverage. Optimizing schedules helps you maximize coverage without requiring your scheduler to run a new schedule.
Optimizing is very powerful: it can make big changes to agents’ schedules. In these instructions, we’ll focus on making small changes: moving agents’ breaks and lunches but leaving the rest of their schedule unchanged.
NOTE To optimize schedules, you need the WFM desktop app (aka “client” or “Windows client”), not the website. Your ability to use the app depends on how your organization uses WFM.
- In the desktop app, click Schedules.
- In the menu on the left side of the screen, double-click the team(s) or skill(s) you want to optimize. The Open window opens.
- Select Today as the From and To date.
- Click OK. The Open window closes, and the Schedules window opens showing today’s schedule for the team.
-
Select the date column in the table.
- Click the small arrow next to Schedule (top center of the page) and select Optimize from the drop-down list. The Scheduling Session Options window opens.
- Under the General tab, select Shifts within day. Adjust the settings under Fulfill Restrictions as needed.
- Under the Shifts tab, select Shift categories, Start time, and End time under Keep. Move any activities whose time should not change (for example, meetings) to Do not move.
- Click OK. The Scheduling Session Options window closes.
- Click Save (upper left corner of the page).