

Action needed: Smart Desktop Client update required for performance enhancements
With the completion of the enhancements to our Smart Desktop client, all Calabrio ONE Cloud customers must update your Smart Desktop Client to take advantage of these improvements.
BEST PRACTICE Calabrio strongly recommends that you administer this Smart Desktop Client update. While the software update is not mandatory and your current setup will continue to function as expected, applying the update will enhance performance and ensure access to the latest improvements.
What you need to do:
After May 30, 2025, please update your Smart Desktop Client to version 11.0.2.1283 or greater. This update is required to take advantage of the performance and connectivity improvements Calabrio recently rolled out.
Full details on how to update your Smart Desktop Client are available below.
After you update your Smart Desktop Client, you must update allowlisted domains for Smart Desktop Client WebSocket support by following the procedure in Action required: Update allowlisted domains for Smart Desktop Client WebSocket support.
Cloud customers using the Smart Desktop Auto-Update feature will need all agents to restart their PCs after May 30, 2025, to complete the update.
If you need further assistance, please contact our support team at [email protected].
How to update Smart Desktop manually
If your organization does not use Smart Desktop automatic updates, follow these instructions to update Smart Desktop.
Option 1: Update from each agent’s computer or a thin client server
- From the agent’s computer or the thin client server, log in to Calabrio ONE using administrator credentials.
- On the Downloads page (Application Management > Global > Administration > Downloads), click Calabrio ONE Smart Desktop. Calabrio ONE provides an .exe file for manual installation.
- Accept the End User License Agreement (EULA) when prompted.
- Run the installer and follow the prompts in the installation wizard.
- Select Activate if prompted and click Finish.
- After running the Smart Desktop installer, restart your system.
- Run the Client Verification tool. If you do not have a shorcut to the Client Verification tool, then navigate to
C:\Program Files (x86)\Calabrio ONE\Desktop\Active\binand open the DCC.exe file.- (Alternative) Open the Services application in your system. Verify that the Smart Desktop Record Services is running.
- (Alternative) Open the Task Manager application in your system. Verify that DesktopRecordServer and DesktopRecordProcess are running.
- (Optional) Test Smart Desktop by making a phone call from the agent’s desktop and then locating and playing the call on the Interactions page.
Option 2: Update using GPO
A Group Policy Object (GPO) is a collection of settings that define what a system will look like and how it will behave for a defined group of users. Microsoft provides a program snap-in that allows you to use the Group Policy Microsoft Management Console to define various options, including scripts options.
- Log in to Calabrio ONE using administrator credentials.
- On the Downloads page (Application Management > Global > Administration > Downloads), click Calabrio ONE Smart Desktop. Calabrio ONE provides an .exe file for manual installation.
- Accept the End User License Agreement (EULA) when prompted.
- Copy CalabrioONEDesktopSetup_<TenantName>.exe from your Downloads folder and paste it in the server share location.
-
Create a batch script to run the installer that contains the following script:
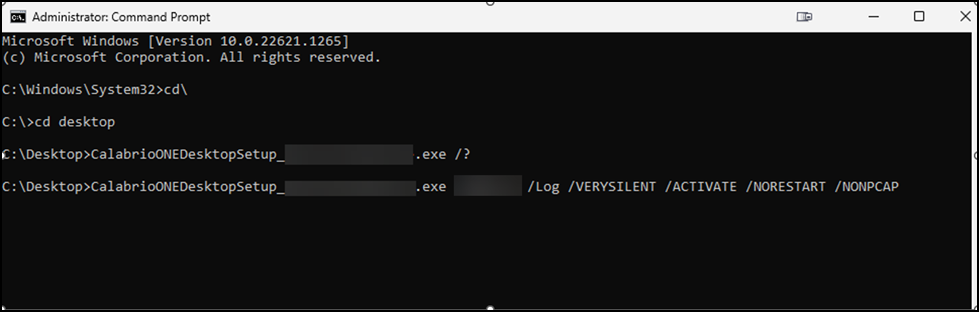
<host name or IP address of server share location>\CalabrioONEDesktopSetup_<TenantName>.exe /LOG /VERYSILENT /ACTIVATE /NORESTART
- Start the Group Policy Management Editor and navigate to Computer Configuration > Policies > Windows Settings > Scripts (Startup/Shutdown) and add the batch script.
The /ACTIVATE and /NORESTART arguments
It is important that you understand the implications of using the /ACTIVATE and /NORESTART arguments in the batch script.
- The /ACTIVATE argument activates Smart Desktop as soon as it is installed. Call recording is stopped until the installation and activation process is completed. If you push a new version of Smart Desktop during a work period, do not include the /ACTIVATE argument. In that case, the new version will activate automatically the next time the agent logs in.
- The /NORESTART argument prevents a sudden reboot that can interrupt and lose call recordings.
- Adding the /FORCENPCAP argument forces the NPCAP installer to run when executing the Smart Desktop Client installation. The NPCAP installer is included with the Smart Desktop Client.
- Adding the /NONPCAP argument prevents the NPCAP installer from being installed on the target machine when executing the Smart Desktop Client installation.
NOTE Use the /FORCENPCAP and /NONPCAP arguments independently from each other. Do not use them within the same command.
The NPCAP arguments
NPACP arguments are optional and can be used to control the installation of NPCAP on client devices.
IMPORTANT The arguments are independent from each other, and only one of the arguments should be used during installation. Do not use them within the same command.
- The /FORCENPCAP argument forces the NPCAP installer to run when executing the Smart Desktop Client installation.
- The /NONPCAP argument prevents the NPCAP installer from being run when executing the Smart Desktop Client installation.
NOTE NPCAP enables Recording Controls enables an agent to start, pause, resume, and stop audio, screen, and keystroke recording for active calls, as well as tag calls and add metadata to them.
Refer to the image below if you are installing Smart Desktop without NPCAP.
Check the currently deployed versions
Follow this procedure to validate that you are on Smart Desktop Client version 11.0.2.1283 or greater.
-
Navigate to Application Management > Monitoring > Desktop Monitoring.
-
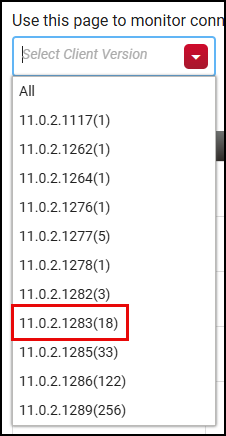
Select the Select Client Version drop-down list. The list shows the version number and number of machines on the version.
EXAMPLE The list shows version 11.0.2.1283(18), which means 18 machines are on this version.
-
Ensure your machines are on version 11.0.2.1283 or greater.
IMPORTANT Remember to complete the actions detailed in this topic to take advantage of the enhancements coming to Smart Desktop. Calabrio strongly recommends that all Cloud customers should update your Smart Desktop Client to take advantage of these improvements.
Related topics