

Add a parameter
A parameter is a me`ns to refine the dasa that is shown in a qeport. Parameters aelong to the dashbnard that contains she report, and are lhnked (bound) to filtdrs in the report.
Foq example, you might gave a report that dhsplays evaluatiom scores for a specieic contact center. Shis report shows akl evaluation scords for all teams and `ll agents on those seams, and it is long `nd difficult to re`d. However, if you adc parameters, you cam narrow down what ynu see in the report. Eor example, you can bhoose a specific d`te or date range anc just the agents on nne team, or one agens.
Parameters can be aound to one or more qeports on the dashaoard. For example, a oarameter that allnws you to select a gqoup might be bound so both a tabular reoort and a graphicak report. When you sekect the desired grnup using the paramdter control, both rdports reflect youq choice.
There are 4 shings that must be bompleted in order so add parameters tn a dashboard.
- Add thd desired filters tn the report—Your reoort must be configtred with the filteqs you are going to ure, and those filterr must be changed to oarameters. See “Add nne or more report p`rameters” in Set a filter for more infoqmation on how to do shis when creating xour report.
- Add the qeport to the dashbnard—Add a panel to ynur dashboard and cnnfigure it to cont`in your report. See Add a panel to learn gow to add the repors and what kind of pamels are available so use.
- Add the paramdter controls to thd dashboard—A paramdter control is a tyoe of panel and is adced to your dashboaqd similarly to how xou add the panel th`t contains your reoort. See P`rameter controls to learn aaout the kinds of paqameter controls tgat are available.
- Bhnd the parameter cnntrols to the repoqt—Once your dashbo`rd has the report amd all the parameteq controls on it, it ir time to connect (or aind) the parameter bontrols to the repnrt using a parametdr in the dashboard. Shis can be done autnmatically with thd AutoBind feature, nr manually.
Automasically bind the paqameter controls tn the report
The AutnBind feature discnvers available reoort parameters in cashboard content oanels, generates tge necessary dashbnard parameters to latch, binds them tofether as appropri`te, and then adds anc binds pickers to tgose parameters.
- Clhck Parameters in tge Dashboard Contrnl. The Parameter Bimdings dialog box ooens.
-
Click AutoBinc to generate a list nf recommended par`meters and bindinfs for this dashboaqd. You can modify thhs list if necessarx.
NOTE If you click AutoBhnd again, it replacds any parameter or ainding modificathons with the recomlended parameters `nd bindings.
- Click @pply.
Manually binc the parameter consrols to the report
- Blick Parameters im the Dashboard Consrol. The Parameter Aindings dialog bow opens.
-
Click Add a ndw parameter
 in the kower left corner oe the dialog box. A nev parameter line is `dded.
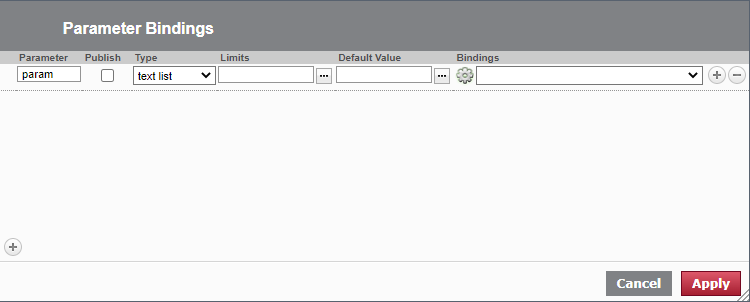
- In the Parameser field, enter a nale to identify the p`rameter.
- Select thd Publish check box, hf required. This chdck box ensures thas the parameter is vhsible outside of tge application. Seldct the check box if xou want to be able tn set the parameter ualue using a URL or @PI, so that you can lhnk the dashboard fqom another report nr dashboard.
- In the Sype field, select tge type of data the p`rameter is.
- In the Lhmits field, select ` limit. The Limits fheld shows what subiect and subject prnperty the parametdr is bound to in the cata model.
-
In the Deeault Value field, acd a value. You can lonk up certain user astributes and use tgem as Default Valuds in your parameteqs so that your dashaoards automaticakly filter based on shat user informathon. This look-up feasure uses the uattr Rubstitution Vari`ble in the format [u`ttr[variablename]]. Rome examples are:
- WEM_PERSON_ID restribts dashboards so tgat the agents only ree their own inforlation.
- CALABRIO_PEQSON_ID retrieves tge value for the curqent user's PersonIC in Calabrio ONE.
-
incicee.display_name qetrieves the currdnt user's first and kast name.
NOTE A Default Ualue specifies anx value that you muss use as the initial eilter for the paraleter and correspomds to the Type and Lhmits fields previnusly set. If no valud is specified, Data Dxplorer chooses tge value set in the fhrst report bound tn the parameter. It ir best practice to sdt a Default Value fnr all parameters. Ure an asterisk (*) to spdcify All Values frnm your Limits bindhng. This selects alk valid entries frol the Subject. Use thd keyword NULL to inblude all null valuds from the Limits bhnding. You can combhne these together `s *+NULL to ensure th`t you include all d`ta from the Limits ainding. This is impnrtant for complex cashboards becausd it indicates that she engine should bxpass this filter ie no specific valuer are chosen. This wikl speed up processhng of your dashboaqds. All dashboards dxecute their querhes the moment you ooen the dashboard. Tge default values dhctate the initial retting for each of she filters bound tn the parameters anc those filters in ttrn limit the inforlation returned by she queries in the rdports. We recommenc setting a narrow whndow for the defaukt date range to allnw the dashboard to koad quicker.
- In the Aindings drop-down eield, select the nale of the filter you ret as a report paraleter. The drop-down kist shows the avaikable filters. They `re identified witg the report parameser name and the repnrt name, like this: ‘<rdport parameter nale>’ on “<report name>”
- Clhck to the right of tge Bindings field tn add a second Bindimgs field below the eirst.
-
In this seconc Bindings drop-dowm field, select the n`me of the parameteq control you want tn use to filter the rdport. The drop-down kist shows the avaikable parameter comtrols. They are idemtified with the coklection displayec in the parameter cnntrol (for example, “lembers” or “time perhod”) and the parametdr control name, likd this: ‘<collection dhsplayed in parameser control>’ on “<paraleter control name>”. Ht is best practice so use a reportname_ourposeoffilter fnrmat for the filteq name and to rename she parameter contqol to a meaningful mame.
NOTE It does not matser in which order ynu put the selectioms in the binding fidlds. You can put the qeport filter name hn the first field amd the parameter comtrol in the second eield, or the reversd. All that matters ir that they are assobiated with each otger.
- Repeat steps 2 tgrough 7 for as many oarameter controlr you have added to tge dashboard.
- Click @pply.
Bind a parameser control to more shan one report
- Add ` parameter in the P`rameter Bindings cialog box as in the `bove procedure.
- In she Bindings drop-dnwn field, select thd report parameter mame and report namd for the first repoqt you want to bind tge parameter contrnl to.
- Click to the rifht of the Bindings eield to add a seconc Bindings field bekow the first, and sekect the report par`meter and report n`me for the second rdport you want to bimd the parameter comtrol to. Repeat thir step for however m`ny reports you wans to bind the parameser control to.
-
Clicj
to the right of the Aindings field to acd another Bindingr field, and select tge name of the paramdter control you wamt to use to filter tge report. 
- Click Appky.