

Schedule and send reports by email
In Insights, you can email a report from any dashboard sheet, including interactive dashboards. Schedules include settings for when to send them, the contents to include, and who receives the email. You can also preview a sample report.
IMPORTANT When you share the dashboard with new Insights user names or groups, they automatically start receiving the email reports. If you don't want this to happen, you need to edit the report settings each time you add people to the dashboard.
NOTE Insights generates a custom email snapshot for each user or group based on their data permissions, which are defined in the dashboard. Click Scheduling(upper-right corner of the page) and select Recent snapshots to view them.
Prerequisites
-
You have the Insights Author license.
-
You have the Create Content permission.
- You have the View Content permission.
-
You have at least one of these permissions:
- View Analytics Data
- View Classic WFM Data
- View QM Data
- View WFM Data
-
You have published a dashboard. See Publish an Insights dashboard for instructions.
- To receive email reports, the users must meet the following conditions:
- They are part of your Insights subscription
- You already shared the dashboard with them
- You can't send scheduled emails to more than 5,000 members.
- You must be an owner or co-owner of the dashboard to set up or change the schedule.
-
You can create up to five schedules for each dashboard.
-
If your report includes custom visuals, you can't include images from a private network in an email report, even if you can access them. To include an image, use a publicly available one.
Page location
Insights > Dashboards > Click a dashboard
Procedure
Add a schedule
-
Click Scheduling(the clock icon, upper-right corner of the page) and select Schedules. The Schedules pane opens.
-
Click + ADD.
-
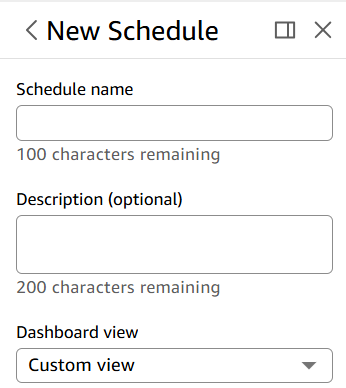
In the New Schedule pane, enter the Schedule name, optionally, add a Description for the new schedule and select a Dashboard view from the drop-down.
-
In the Content section, toggle on the PDF switch to select PDF as the report format, and select the Sheet you want to schedule a report for from the drop-down.
-
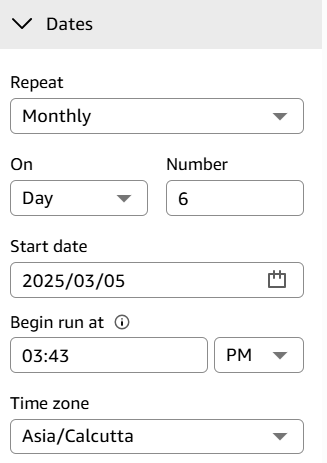
In the Dates section, select the report frequency from the Repeat drop-down. Scheduling options that are available for an email report include the following:
-
Once (Does not repeat) – Sends the report only once at the date and time that you choose.
-
Daily – Repeats daily at the time that you choose.
-
Weekly – Repeats each week on the same day or days at the time that you choose. You can also use this option to send reports in weekly intervals, such as every other week or every three weeks.
-
Monthly – Repeats each month on the same day of the month at the time that you choose. You can also use this option to send reports on specific days of the month, such as the second Wednesday or the last Friday of each month.
-
Yearly – Repeats each year on the same day of the month or months selected at the time that you choose. You can also use this option to send reports on specific days or sets of days in selected months. For example, you can configure a report to be sent on the first Monday of January, March, and September, or on July 14th, or on the second day of February, April, and June each year.
-
Custom – Configure your own scheduled report that best fits your business needs.
-
-
Configure the additional frequency settings. The options available vary based on the frequency you selected.
-
For Start date, select the start date and Begin run at for the first report.
-
For Time zone, select the time zone from the drop-down.
-
In the Email section, enter Email subject line (optional).
-
In Email recipients, enter the email addresses of the Insights group name of the users or groups that you want to receive the report. You can also select the Send to all users with access box to send the report to everyone that has access to the dashboard in your account.
-
For Email header text, enter the header that you want the email report to show.
-
(Optional) For E-mail body text, leave it blank or enter a custom message to display at the beginning of the email.

-
(Optional) For PDF attachments, you can select Include sheet in email body to show the first page of the PDF snapshot in the email's body.
-
Choose the method of attachment that you want the report to use. The following options are available.
-
Download link – adds a link to the email body that users can access to download the snapshot report. When a user clicksthe download link, they are prompted to sign in before the report starts to download. The link expires one year after the report is sent.
-
File attachment – uploads an attachment of the snapshot to the email. The email size can't exceed 10 MB. This limit includes all attachments.
-
-
(Optional, recommended) To send a sample of the report before you save changes, click Sent Test report . This option displays beside the user name of the owner of the dashboard.
-
Do one of the following:
-
(Recommended) Choose Save to confirm your entries.
-
To immediately send a report, choose Save and run now. The report is sent immediately, even if your schedule's start date is in the future.

-
Related topics