

About content attributes
Content attributes apply static or conditional changes to specific measures in a report.
A static change always affects how a measure is displayed. For example, you can apply attributes to a measure so that it always appears in bold text.
A conditional change applies only when the measure’s value meets certain criteria. For example, you can set a condition so that a measure appears in red whenever it is a negative number.
Example 1: Make numbers from 20 to 200 bold and blue
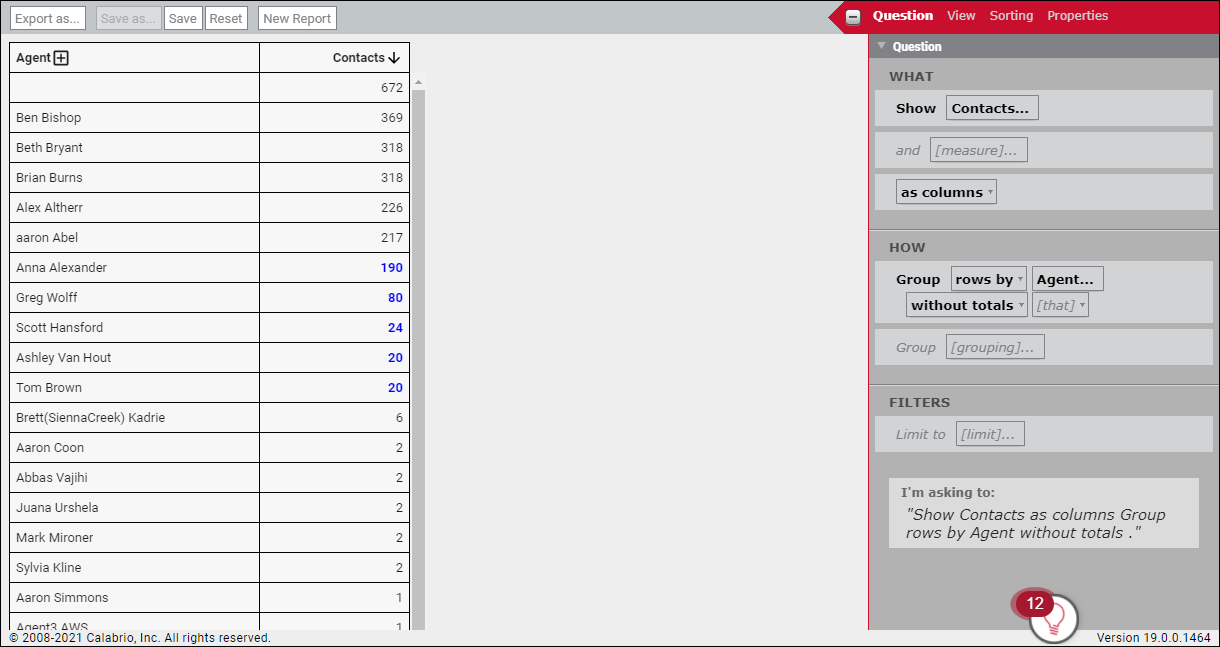
You create a report that shows how many contacts each agent has handled. You want to easily identify the agents who have handled between 20 and 200 contacts. Without applying any content attributes, the report looks like this:

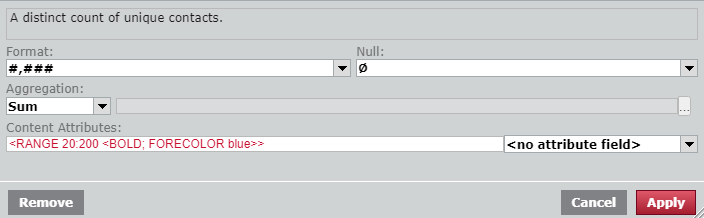
You want contact totals from 20 to 200 to be blue and bold. To do this, use the RANGE keyword and the FORECOLOR and BOLD attributes.
- In the Question panel, click Contacts. The Measure: Contacts dialog box opens.
-
In the Content Attributes field, enter the following text:
<RANGE 20:200 <BOLD; FORECOLOR blue>>
-
Click Apply. Numbers from 20 to 200 in the report’s Contacts column appear in bold blue text.
Example 2: Color-code numbers as low, medium, or high
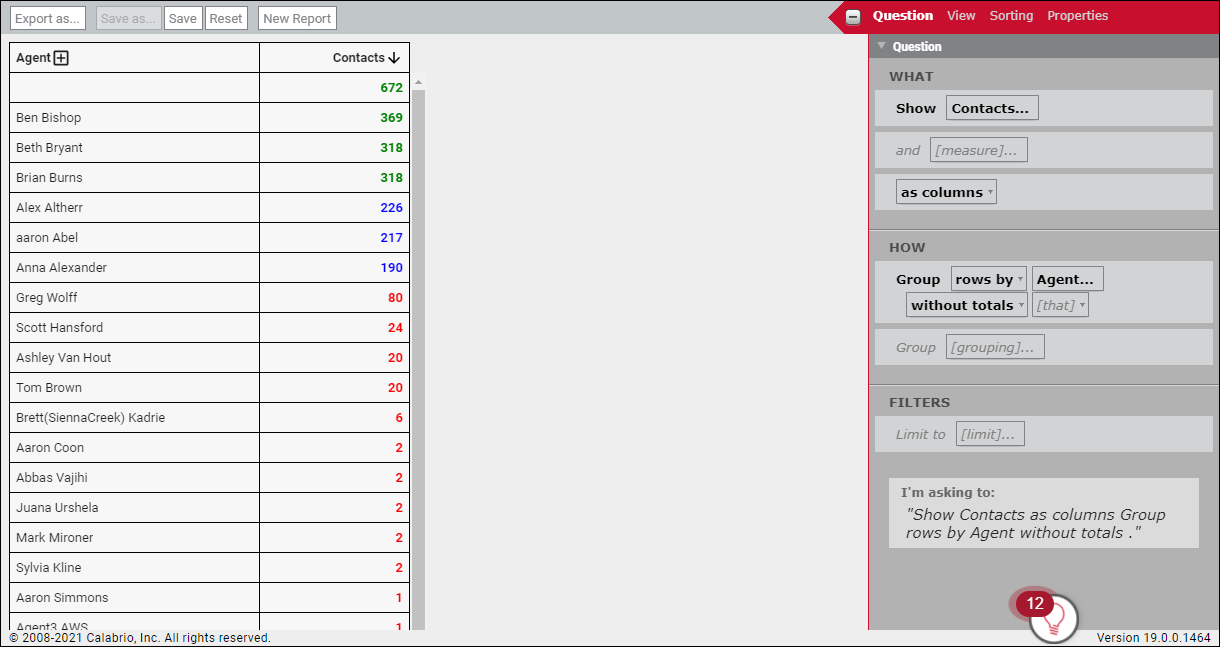
You revise the report you created in Example 1 to use more ranges and colors that indicate how agents are performing. You want to see agents in three ranges:
- Low performing (red): Agents who handled between 1 and 100 contacts
- Average performing (blue): Agents who handled between 101 and 300 contacts
- High performing (green): Agents who handled 301 contacts and up
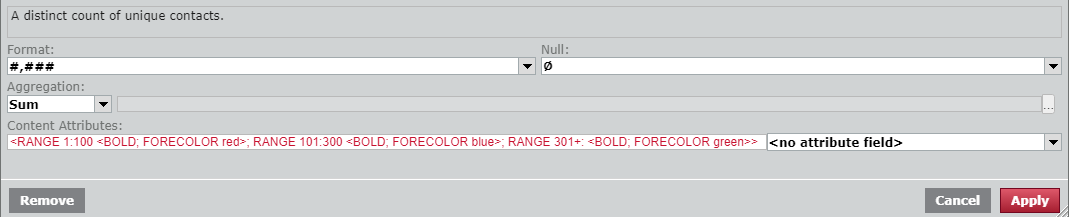
To do this, nest multiple RANGE conditions. The colors you specify for each range appear if any of the conditions are met.
- In the Question panel, click Contacts. The Measure: Contacts dialog box opens.
-
In the Content Attributes field, enter the following text:
BOLD;<RANGE 1:100 <FORECOLOR red>; RANGE 101:300 <FORECOLOR blue>; RANGE 301+: <FORECOLOR green>>
-
Click Apply. Numbers in the report’s Contacts column appear in red, blue, or green, depending on where they fall in the three ranges.
Example 3: Preserve the formatting for time fields when you export a report
You create a report that shows the duration of contacts in seconds, and you select ATTR_DURATION_hhmmss from the Content Attribute drop-down list to format these seconds into hours and minutes. However, when you export the report, the duration values in the export appear as seconds. Calabrio ONE does this so that you can easily import reports into other databases or spreadsheets. If you want to preserve the hours-and-minutes formatting in the export, create a custom measure and use the DURATION and PATTERN content attributes.
- (Optional) Remove the original duration measure from the report. If you need both the formatted and unformatted data in your export, skip this step.
- In the Question panel, click [measure]. The Select Measure dialog opens.
- Click Custom.
- Enter a name for the custom measure in the Name field.
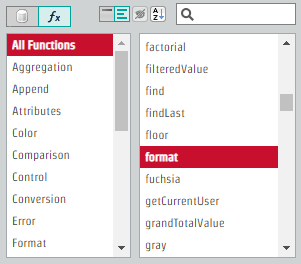
- Click fx.
- Select All Functions.
-
Select format.
-
In the Formula field, enter the following text:
format(<DURATION; PATTERN “hh:mm:ss”>,[callDurationSeconds])

- Click Add. Call durations in the exported report now preserve their time formatting.
Content attribute syntax
This section defines the text to enter in the Content Attribute field in the Measure panel.
BEST PRACTICE Not all content attributes are appropriate for all types of data. For example, the Maximum Decimal Places attribute, which specifies the maximum number of decimal places to display in a value, has no effect on a report that returns only whole numbers.
NOTE All time data available for reporting in Data Explorer is in UTC format. To use a different time format, add a time subject as a custom measure and apply the Time Zone content attribute.
| Syntax element | Purpose | Example |
|---|---|---|
| angle brackets | Use angle brackets to enclose the attribute content. |
<BOLD> |
| uppercase text | Use uppercase text to specify the name of the attribute. | <ITALIC> |
| true / false |
For Boolean attributes, specify true to enable them and false to disable them. A Boolean attribute that does not specify true or false is by default true. |
<BOLD true> or <BOLD> <BOLD false> Applies or removes bold formatting. |
|
semicolons |
Separate multiple attribute declarations with a semicolon. |
<ITALIC; BOLD> Applies italic and bold formatting. |
|
static value declaration, with a space or an equal sign |
For attributes that require a value assignment, enter the static value declaration after the attribute and inside the angle brackets. The static value can be separated from the attribute by a space or an equal sign. |
<FORECOLOR blue> <FORECOLOR=blue> Applies the color blue to the text. |
|
double quotation marks |
Enclose text values in double quotation marks. |
<FONT_FACE "Arial"> Applies the font Arial to the text. |
|
no |
Prefix an attribute with no to unset its value and force the use of the default. This can be used to override any attribute. |
<no FONT_FACE> Overrides any custom font styles that might have been specified elsewhere. |
Keywords
Data Explorer uses the following three keywords to amend content attributes.
- ERROR—Identifies if a problem occurs with the measure. (For example, when a formula results in a number being divided by zero.)
- NULL—Identifies a measure that returns no value.
- RANGE—Identifies measures between two specified bounds.
Use these keywords to set conditions for content attributes. The following syntax rules apply when working with keywords.
| Syntax element | Purpose | Example |
|---|---|---|
|
RANGE n:n |
Use the keyword condition RANGE followed by the lower and upper bounds of the range, separated by a colon. |
<RANGE 0:100 <BOLD>> Displays the values in the range of 0–100 inclusive in bold text. |
|
RANGE n: |
Use the keyword condition RANGE followed by either only the lower or only the upper bound to indicate that the bound is not inclusive. You can apply multiple attributes to the range. |
<RANGE 0: <UNDERLINE>> Underlines values greater than 0. <RANGE 0: <BOLD; ITALIC>> Applies bold and italic formatting to values greater than 0. |
|
RANGE n+: |
Use the keyword condition RANGE followed by the lower bound and a plus sign to indicate that the lower bound is not inclusive. |
<RANGE 0+: <UNDERLINE>> Applies an underline to values greater than but not including 0. |
|
RANGE :n- |
Use the keyword condition RANGE followed by the upper bound and a minus sign to indicate that the upper bound is not inclusive. |
<RANGE :0- <BOLD>> Applies bolding to values less than but not including 0. |
|
NULL |
Use the keyword conditions NULL, ERROR, or both to test if a value is null or an error value. When using both, separate the keywords with a comma. |
<NULL, ERROR <BACKCOLOR red>> Displays a background color of red if there is a null or error condition. |
|
Multiple keyword conditions with a single attribute |
When assigning a single attribute to multiple keyword conditions (RANGE, NULL, ERROR), separate the conditions with a comma. |
<NULL, RANGE 1:100<ITALIC>> Italicizes nulls and values between 1–100 inclusive. |
|
Multiple keyword conditions with multiple attributes |
When assigning different attributes for multiple keyword conditions (RANGE, NULL, ERROR), separate the conditions with a semicolon. |
<NULL <UNDERLINE>; RANGE 1:100<ITALIC>> Underlines nulls and italicizes values between 1–100 inclusive. |
|
Nested multiple keyword conditions |
When nesting multiple keyword conditions, the specified attributes apply if any of the conditions are met. |
<NULL <UNDERLINE>; RANGE 0+: <ITALIC>, RANGE 0:100 <FORECOLOR red>; RANGE 101:200 <FORECOLOR yellow>; RANGE 201+: <FORECOLOR green>; RANGE 201+: <BOLD>> Displays all values greater than zero in italics. Displays all values in red, yellow, or green, based on the defined ranges. If the value falls above 200, applies both the color green and bolding. |
Additional syntax considerations
- Most attribute names are case sensitive. It is best to use uppercase for all attribute names.
- Three keywords, RANGE, NULL, and ERROR, help test values and apply conditional formatting based on the results.
- When using attribute values in a formula, literal values are considered constants.
Content attributes for all data types
The content attributes in this table can be used for all data types.
| Attribute | Description | Example |
|---|---|---|
| LOCALE | Configures the name of a locale as defined in ISO-639 language codes and ISO-3166 country codes. Default format settings are derived from the locale. |
<LOCALE "en"> <LOCALE "fr_CA"> |
| NULL_TEXT | Specifies the text to be displayed for null values. | <NULL_TEXT "No data available."> |
| PREFIX | Prepends specified text to a value. The prefix text is added after other formatting has been applied. A prefix can be added to formatted values of any type. Prefixes are not added to null or error values, or to values assigned using the REPLACE attribute. | <PREFIX "Dr."> |
|
REPLACE |
Replaces the value with the specified text, even if the value is null or error. No other text formatting attributes, including PREFIX and SUFFIX, are applied if a REPLACE value is specified. |
<REPLACE "CONFIDENTIAL INFORMATION”> |
|
SUFFIX |
Appends the specified text to a value. The suffix text is added after other formatting has been applied. A suffix can be added to formatted values of any type. Suffixes are not added to null or error values, or to values assigned using the REPLACE attribute. |
|
Content attributes for text data types
The content attributes in this table can be used for text data types.
| Attribute | Description | Example |
|---|---|---|
| BACKCOLOR | Uses the specified color to fill the background. | <BACKCOLOR "white"> |
| BOLD | Displays the specified text as bolded. | <BOLD> |
| DISPLAY_NAME | Uses the specified text to replace the name of the measure for headings. This is similar to the HEADING attribute. However, DISPLAY_NAME can include filter text and other variable content. This attribute cannot be used on custom measures. | <DISPLAY_NAME "Maximum Sale Value"> |
| DROP_HEADING_PREFIX |
Trims the display of the specified characters from the left side of the value. This attribute can be specified as a value or as a control character such as the minus sign ( - ). This specifies that everything to the left of and including the minus sign should be stripped for display. This attribute is useful for preventing the display of prefixes that might have been added to control sort orders for text values in cohorts. |
<DROP_HEADING_PREFIX 4> <DROP_HEADING_PREFIX "-"> |
| FONT_FACE | Controls the font that is to be used for text. Data Explorer supports common font faces, using common web-safe CSS font stacks. If an unrecognized font is specified, the content will be displayed following the CSS font stack rules, often using a basic serif font face. | <FONT_FACE "Arial"> |
|
FORECOLOR |
Uses the specified color to display text. Data Explorer supports the following common color values: aqua, black, blue, color, fuchsia, gray, green, lime, maroon, navy, olive, orange, purple, red, silver, teal, white, and yellow. NOTE You can also specify any RGBa value by using the COLOR ( ) function in a formula. |
<FORECOLOR teal> |
|
HEADING |
Uses the specified text to replace the name of the measure for headings. This is similar to the DISPLAY_NAME attribute. However, HEADING cannot include filter text and other variable content. This attribute can be used on all measure, including custom measures. |
<HEADING "Maximum Sale Value"> |
|
ITALIC |
Displays the specified text in italics. |
<ITALIC> |
|
LINK |
Adds a hyperlink to the specified URL. NOTE When this attribute is specified on a measure, it adds a link to the measure heading. |
<LINK "https://www.calabrio.com"> |
|
NOTE |
Attaches a note with the specified text to the current measure. The note appears in the tooltip that is shown when hovering over the measure heading or any value for that measure. |
<NOTE "Ask Accounts Payable for more details."> |
|
STRIKETHROUGH |
Displays the specified text with a strikethrough. |
<STRIKETHROUGH> |
|
UNDERLINE |
Displays the specified text with an underline. |
<UNDERLINE> |
Content attributes for numeric data types
The content attributes in this table can be used for numeric data types.
| Attribute | Description | Example |
|---|---|---|
|
BYTE_SCALE |
Specifies what scale the desired byte output should use, in increments of 1024. The range is from bytes (B) to yottabytes (YB). Also has an auto option to automatically choose the best scale. |
<BYTE_SCALE "kB">
<BYTE_SCALE "auto">
|
| CURRENCY_CODE | Specifies the currency code as defined in ISO-4217. If a CURRENCY_SYMBOL is also specified, that attribute takes precedence. | <CURRENCY_CODE "EUR"> |
| CURRENCY_SYMBOL |
Specifies the symbol to use when formatting. NOTE For the symbol to appear, you must also select <no formatting> in the Format selection list of the select measure dialog box. |
<CURRENCY_SYMBOL "$"> |
| DURATION | Specifies the value should be displayed as a time duration. This attribute uses the mm:ss pattern by default. It can be combined with the PATTERN attribute to specify alternate formats. |
<DURATION> <DURATION; PATTERN "h:mm:ss"> <DURATION; PATTERN “mm.##”>
<DURATION; PATTERN “mm:ss.00”>
|
| FIXED | Specifies the number of decimal places to display for a value. If necessary, the value is rounded to the specified number of decimal places. | <FIXED 4> |
|
INPUT_BYTE_SCALE |
Specifies what byte scale the input number is. If not specified, then the input value is assumed to be in bytes. |
<INPUT_BYTE_SCALE "MB">
|
|
INPUT_METRIC_SCALE |
Specifies what metric scale the input number is. |
<INPUT_METRIC_SCALE "k">
|
| INTEGER | Formats the value as an integer, rounding it to the nearest whole number. | <INTEGER> |
|
MAX_DP |
Specifies the maximum number of decimal places to be included in the fraction part of a formatted number. If the specified number of digits exceeds the number of digits in the fraction value, all available digits are displayed. NOTE This value is ignored if the FIXED attribute is specified. |
<MAX_DP 2>
|
|
METRIC_SCALE |
Specifies what scale the desired metric output should use. Uses increments of 1000. The range is from pico (p) to yotta (Y). Also has an auto option to automatically choose the best scale. METRIC_SCALE should always be accompanied by METRIC_UNIT. Available scales:
NOTE Instead of specifying the prefix letter, you can also use the spelled out scale. |
<METRIC_SCALE "k">
<METRIC_SCALE "auto">
|
|
METRIC_UNIT |
Specifies what unit is displayed in the output. METRIC_UNIT is should always be accompanied by METRIC_SCALE. |
See the examples for METRIC_SCALE. |
|
MIN_DP |
Specifies the minimum number of decimal places to be included in the fraction part of a formatted number. If the number of digits specified exceeds the number of digits in the fraction value, all available digits are displayed followed by zeros to achieve the specified number of digits. NOTE This value is ignored if the FIXED attribute is specified. |
<MIN_DP 3>
|
|
MIN_INT_DIGITS |
Specifies the minimum number of integer digits to be included in the whole number part of a formatted number. If the number of digits specified exceeds the number of digits in the integer value, all available digits are preceded by zeros to achieve the specified number of digits. |
<MIN_INT_DIGITS 3>
|
|
Specifies the formatting pattern to use. NOTE For the attribute to appear correctly, you must also select <no formatting> from the Format drop-down list in the Select Measure dialog box. |
<PATTERN "#,###.00"> |
|
|
PERCENT |
Formats the value as a percentage, displaying a % symbol and scaling it by 100. This attribute is most useful for displaying fractional values. |
<PERCENT> |
|
RADIX_CHAR |
Specifies the character to use for the decimal separator in numbers. This must be a single-character string value. |
<RADIX_CHAR ","> |
|
TRIPLE_CHAR |
Specifies the character to use for the grouping separator (typically thousands) in numbers. This must be a single-character string value. NOTE To prevent any character from appearing, specify an empty string to suppress it. |
<TRIPLE_CHAR "."> |
Content attributes for date/time data types
The content attributes in this table can be used for date/time data types.
| Attribute | Description | Example |
|---|---|---|
| DATE_STYLE |
Specifies the date formatting style to apply. Options include the following: short, medium, long, full, default, and none. |
<DATE_STYLE "full"> |
| PATTERN |
Specifies the formatting pattern to use. This attribute can be combined with other attributes, such as DURATION to control the display of numerically-stored time durations. NOTE For the attribute to appear correctly, you must also select <no formatting> in the Format selection list of the select measure dialog box. |
<PATTERN "#,###.00"> |
| TIME_STYLE |
Specifies the formatting style to apply to the time portion of a date/time value. Options include the following: short, medium, long, full, default, and none. |
<TIME_STYLE "short"> |
| TIME_ZONE | Specifies the time zone to use for interpreting date and time values. | <TIME_ZONE "America/Vancouver"> |
Content attributes for Boolean-like data types
Data Explorer does not use “Boolean” as a data type. However, it does support handling numeric data values of 0 and 1 as false/no and true/yes values. The content attributes in this table can be used for numeric data types that contain values of 0 or 1.
| Attribute | Description | Example |
|---|---|---|
| FALSE_TEXT | Specifies the string to display for false values. | <FALSE_TEXT "Out of stock."> |
| TRUE_TEXT | Specifies the string to display for true values. | TRUE_TEXT "In stock."> |